 |
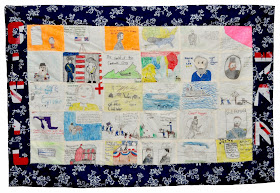
| Civil War Commemorative Quilt / School Project, Macon, Georgia |
This wonderful quilt came to me earlier in the year, and I am finally getting around to editing the photos. My interest in finding out more about it is renewed, but for this blog it will serve as a response to one of the most common questions I get: how are the pictures done? This series of pictures should help explain.
 |
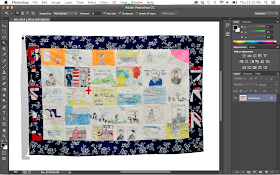
| Here is what the picture looks like before editing |
It is helpful to know a little about photography and have some computer knowledge when trying to produce a publication quality image of a quilt, with background fully cut out. I use Adobe Photoshop, and I am self-taught. Been using the program since 1997.
 |
| It looks like a little ink stamper - what a clever idea! |
The tool I use most is called "Clone Stamp" and it works by copying one part of an image and replacing another area of the photo with information from the copied area. In other words, you clone it from one place, then you stamp it in another place- clone stamp!
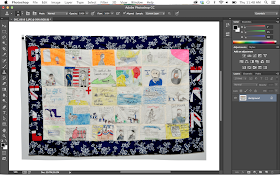 |
| image with top edge clone stamped, and the other three edges are raw |
To me, it's a simple concept, bot some folks really struggle with the idea. Maybe some pictures would help…
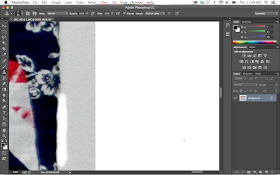 |
Enlarge this picture and look for the plus sign in the lower right of the
white area. I am cloning the white from that area and stamping it
into the gray band next to the quilt to achieve a cut-out effect. It is
similar to erasing, but you are really placing information from one
area into a different area - the information I am using happens to be
the plain white background |
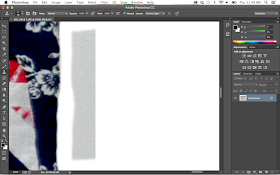 |
after stamping the area next to the quilt, I often leave a rectangle, which is
simply selected and deleted |
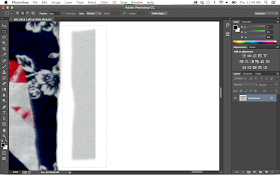 |
if you enlarge the picture and look closely you can see a dotted line box
around the gray- that is what it looks like when you select the area to delete |
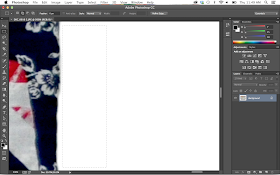 |
| and now the gray is gone |
 |
| keep going all around the edge until all the gray background is gone |
 |
| another detail showing how I use the clone stamp tool |
 |
| ready to crop and finish |
One of the biggest roadblocks for a lot of people has been the cost of owning Photoshop, but that is changing. Adobe is starting to offer Photoshop as a subscription service, so it is more affordable to get than ever before. The other good news is there are plenty of tutorials available online. To see clone stamping in action,
check out this link.
So, that is basically how I do the photos. I start with a raw digital image, crop it, make the canvas size larger by adding white around the edge, and clone stamp the white into the area I am trying to remove. I also remove the clamps by clone stamping areas of the quilt on the top edge where the clamps are holding it. Same concept- information from elsewhere is captured and applied. Pretty cool, eh?


How do you remove your clips from your photo, and do you think an edited (in this way you've described) photo would count as an entry to a quilt show? I'm always worried about fingers or clips being visible; as in, would those disqualify a quilt because the edges are obscured?
ReplyDeleteAnd I love seeing your quilts and photos.
The red clamps are removed the same way, with clone stamping. I just select an area from the quilt and stamp it over the red. If you are photographing an entry for a quilt show, try using your sleeve instead of clamps. :)
DeleteI do not know a lot about entering quilt shows, but have gotten in to the two shows I entered using edited photos- Pacific West Quilt Show last summer, where I got an honorable mention, and MANifestations, coming soon to the Rocky Mountain Quilt Museum.